


خط تراز یک ابزار فوق العاده کاربردی و مناسب برای نصب کردن کاشی و سرامیک روی دیوار است. به کمک این ابزار کاشی ها با دقت و ظرافت بیشتری نصب می شوند و نتیجه نهایی کار تمیزتر و جذاب تر می شود.
این دستگاه به زمین یا دیوار متصل شده و در نصب دقیق کاشی ها به شما کمک می کند. در این مقاله در رابطه با این قطعه و روش کار با آن صحبت خواهیم کرد.
برای کار با خط تراز به چه ابزارهایی نیاز داریم؟
قبل از بررسی روش خط تراز برای سرامیک کاری کف، با ابزارهای مورد نیاز برای کار با این قطعه آشنا می شویم که عبارتند از:
- پایه های قابل تنظیم
- خط تراز
- قلم چوبی
- مقیاس
چگونه از خط تراز برای نصب کاشی های دیواری استفاده کنیم؟
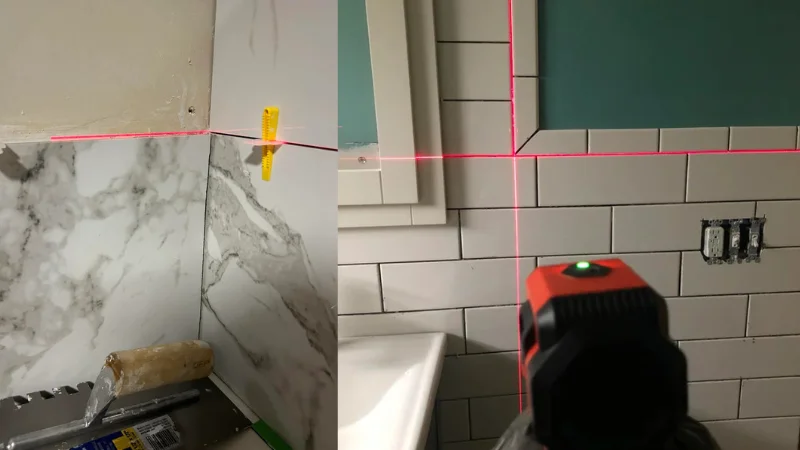
خط تراز کاشی دیوار ابزاری است که جهت نصب کردن کاشی ها روی دیوار مورد استفاده قرار می گیرد. در صورتی که نصب کاشی ها را به واسطه این قطعه انجام دهید از ناهمواری و ایجاد بی نظمی روی دیوار جلوگیری کرده و سطحی زیبا و کاملاً هموار دارید. برای شروع کار با این قطعه به روش زیر عمل کنید.
- در ابتدا سطح دیوار را از هرگونه گرد و غبار یا چربی پاک کرده و آن را صاف و هموار کنید. سپس با کمک یک مداد، محل دقیق قرار گرفتن کاشی ها را روی دیوار علامت بزنید.
- در این مرحله باید کاشی ها را با چسب یا ملات به دیوار بچسبانید. قیمت چسب سرامیک پرسلان در مقایسه با ملات گران است؛ اما نتیجه نهایی کار با این محصول در مقایسه با ملات بسیار تمیزتر و ظریف تر می شود. چسب کاشی را پشت کاشی بمالید و در محل مشخص شده روی دیوار بچسبانید.
- در این مرحله از مراحل کار با خط تراز کاشی دیوار، باید خط تراز را روی زمین قرار داده و ارتفاع آن را به دلخواه خود تنظیم کنید. سپس این خط را مبنا بگیرید و اولین کاشی ها را در امتداد لبه بالای خط بچینید. سایر کاشی ها را نیز به ترتیب در کنار هم قرار داده و در نهایت با کمک خط تراز، صاف و تراز بودن آن ها را مورد بررسی قرار دهید.
- پس از اینکه تمام سطح دیوار را با استفاده از کاشی پوشش دادید اجازه دهید تا ملات خشک شود. سپس با مواد بندکشی سرامیک، درزها و بندهای سرامیک ها را پر کنید.
انواع خط تراز کاشی دیوار
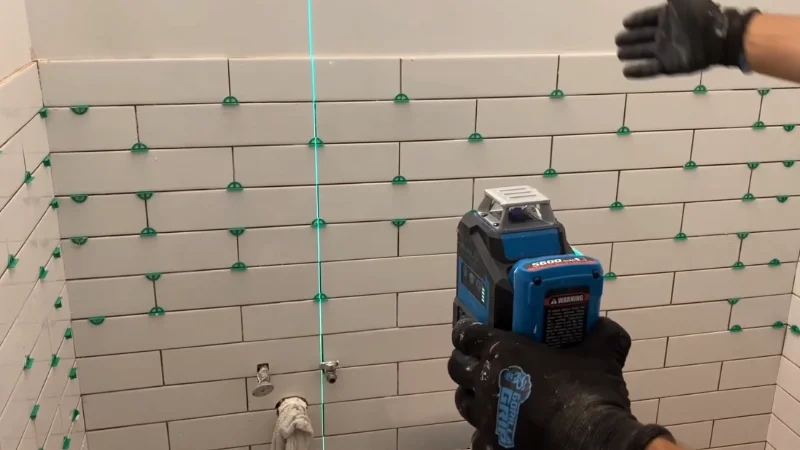
خط تراز کاشی دیوار انواع مختلفی دارد و در نمونه های لیزری، دیجیتالی، دستی و با نوارهای پلاستیکی به تولید می رسد. در این میان مدل های دیجیتالی و لیزری به دلیل سرعت و دقت بالا، جزو مدل های محبوب به شمار می روند.
اگر به دنبال تکنیک های حرفهای در استفاده از خط تراز هستید، از چندین خط تراز به صورت همزمان استفاده کنید؛ به این ترتیب که خط تراز اصلی را در قسمت مرکز دیوار قرار دهید. در فاصله یک سانتی متری آن، خط دوم را قرار داده و خط سوم را نیز با همین فاصله روی دیوار بگذارید. به این روش، فرایند تراز کردن کاشی ها را با دقت بیشتری پیش می برید.
نکات مهم برای تراز کردن کاشی دیوار و کف
برای تراز کردن کاشی دیوار و کف با استفاده از خط تراز کاشی دیوار، به نکاتی که در ادامه اشاره می شود دقت داشته باشید.
- قبل از اینکه کارتان را آغاز کنید از تمیز بودن، صاف بودن و خشک بودن دیوارها اطمینان حاصل کنید.
- خط تراز را روی دیوار قرار داده و ارتفاع آن را با استفاده از پایه های قابل تنظیم به شکل دقیق تنظیم کنید. همچنین محدوده نصب کاشی ها را با کمک مقیاس، مشخص نمایید.
- به هنگام اتصال کاشی ها به جای توجه به نشانه های دیوار به خط تراز دقت داشته باشید.
- برای اینکه از عمود بودن خط تراز بر دیوار مطمئن شوید بهتر است از دستگاه های لیزری استفاده کنید و زاویه کاشی ها را به تدریج با خط تراز تطبیق دهید.
- برای اندازهگیری فاصله بین کاشی ها و تراز کردن آن ها از ابزارهای مناسب مخصوص کاشی کاری استفاده کنید.
- پس از اتمام کار، کاشی ها را مورد بررسی قرار داده و در صورت نیاز کاشی هایی را که به شکل غلط نصب شدهاند اصلاح کنید.
- در انتها به کمک یک پارچه مرطوب و تمیز، کاشی ها را پاک کنید.
سخن پایانی
در این مقاله در رابطه با خط تراز کاشی دیوار صحبت کردیم و فوت و فن های استفاده از آن را به شما توضیح دادیم. به طور کلی خط تراز کاشی یک ابزار بسیار کاربردی است که در انواع پلاستیکی، لیزری، دیجیتالی و دستی در بازار عرضه می شود. این دستگاه کمک میکند تا نصب کاشی ها روی دیوار با دقت و ظرافت بیشتری انجام شود و نتیجه نهایی کار کاملا یک دست باشد.