


بندکشی سرامیک، عنصری حیاتی در زیبایی، بهداشت و دوام هر فضایی است که با سرامیک پوشانده شده است. این ماده علاوه بر پر کردن درزها و جلوگیری از نفوذ آب و آلودگی، نقش مهمی در استحکام و یکپارچگی سطح سرامیک ایفا میکند. با گذشت زمان، عوامل مختلفی مانند رطوبت مداوم، مواد شوینده شیمیایی قوی، فشار فیزیکی و حتی تغییرات دما میتوانند باعث آسیب به بندکشی شوند.
ترک خوردگی، تغییر رنگ، کپکزدگی، پوسته شدن و فرسایش از جمله مشکلات رایجی هستند که بندکشی های آسیبدیده با آن روبرو میشوند. ترمیم بندکشی سرامیک نه تنها به بازگرداندن زیبایی اولیه فضا کمک میکند، بلکه از بروز مشکلات جدیتر مانند آسیب به زیرسازی و رشد قارچ و باکتری نیز پیشگیری مینماید.
در این مقاله، به بررسی جامع فرآیند ترمیم بندکشی سرامیک خواهیم پرداخت. هدف ما ارائه راهنمایی گام به گام، معرفی ابزار و مصالح مورد نیاز و ارائه نکات کلیدی برای دستیابی به بهترین نتیجه است. با این راهنما، شما میتوانید با اطمینان خاطر بندکشیهای آسیبدیده خود را ترمیم کرده و از دوام و زیبایی طولانی مدت سطوح سرامیکی خود لذت ببرید.
چرا بندکشی سرامیک اهمیت دارد؟
پیش از ورود به مراحل ترمیم، ضروری است که اهمیت بندکشی در نصب سرامیک را درک کنیم:
- پیشگیری از نفوذ آب و رطوبت : بندکشی به عنوان یک سد محافظ عمل کرده و تا حد بسیار زیادی از نفوذ آب به زیرسازی سرامیک جلوگیری میکند. این امر به ویژه در محیطهای مرطوب مانند حمام، آشپزخانه و سرویسهای بهداشتی حیاتی است.
- پشتیبانی و تثبیت سرامیک : بندکشی فضاهای خالی بین سرامیکها را پر کرده و به تثبیت آنها کمک میکند. این موضوع از حرکت، لق شدن یا جابجایی سرامیکها جلوگیری مینماید و به افزایش مقاومت فشاری و خمشی سطح کمک میکند.
- افزایش بهداشت : یک بندکشی سالم و بدون ترک، مانع از تجمع آلودگی، گرد و غبار، رشد کپک و قارچ میشود و محیطی بهداشتیتر فراهم میکند.
- زیبایی شناسی : بندکشی تمیز و یکدست، جلوهای زیبا و منظم به سطوح سرامیکی میبخشد و خطوط بصری دلنشینی ایجاد میکند که تکمیلکننده ظاهر کلی فضا است.
علائم نیاز به ترمیم بندکشی سرامیک
شناسایی زودهنگام علائم آسیبدیدگی بندکشی میتواند از هزینههای بیشتر در آینده جلوگیری کند. برخی از این علائم عبارتند از:
- تغییر رنگ و تیرگی : بندکشی ممکن است به دلیل جذب آلودگی، کپکزدگی یا واکنش با مواد شوینده، تغییر رنگ داده و کدر یا سیاه شود.
- ترک خوردگی : ترکهای ریز یا درشت در بندکشی نشاندهنده فرسودگی، حرکتهای جزئی سازه یا زیرسازی، یا استفاده از مصالح نامناسب هستند.
- پوسته شدن و فرسایش : اگر بندکشی به صورت پودری شده و از بین میرود، به این معناست که پیوستگی خود را از دست داده و نیاز به ترمیم جدی دارد.
- بوی نامطبوع : بوی کپک یا رطوبت میتواند نشانه رشد قارچ در بندکشی یا زیر سرامیک باشد که نشاندهنده نفوذ رطوبت است.
- شل شدن سرامیک ها : در موارد شدید، آسیب بندکشی میتواند منجر به لق شدن یا حتی جدا شدن سرامیکها از بستر شود، که نیاز به ترمیم فوری دارد.
مراحل ترمیم بندکشی سرامیک
ترمیم بندکشی سرامیک فرآیندی دقیق است که نیاز به صبر و استفاده از ابزار مناسب دارد. در ادامه، مراحل اصلی این فرآیند را شرح میدهیم :
1. ارزیابی و آمادهسازی اولیه
بررسی میزان آسیب: ابتدا باید میزان آسیبدیدگی بندکشی را ارزیابی کنید. آیا تنها بخشهایی از بندکشی نیاز به ترمیم دارند یا کل سطح باید مجدداً بندکشی شود؟ (گاهی اوقات آسیب محدود به چند درز است و گاهی نیاز به بازسازی کامل بندکشی وجود دارد.)
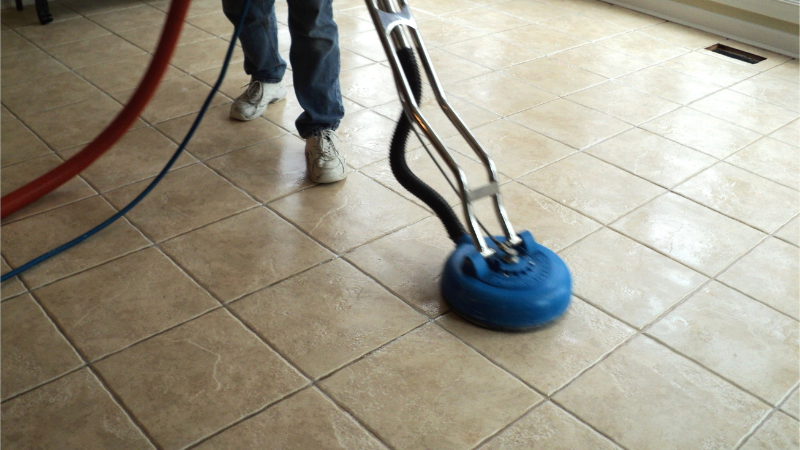
پاکسازی اولیه: سطح سرامیک و بندکشی را با یک پاککننده ملایم و آب گرم تمیز کنید تا هرگونه آلودگی، چربی یا کپک سطحی از بین برود. از مواد شوینده قوی (مانند اسید) بدون اطلاع کافی استفاده نکنید، زیرا ممکن است به سرامیک یا بندکشی آسیب برسانند.
2. حذف بندکشی آسیب دیده
این مرحله، مهم ترین گام در ترمیم بندکشی سرامیک است. حذف دقیق بندکشی قدیمی، زمینه را برای یک بندکشی جدید و بادوام فراهم میکند.
- ابزار مناسب : برای این کار میتوانید از ابزارهایی مانند کاردک بندکشی، اسکنه کوچک یا حتی یک پیچگوشتی تخت با دقت استفاده کنید. در پروژههای بزرگتر، ابزارهای برقی مانند فرز انگشتی (فرز مینیاتوری) با سری مخصوص اصلاح بندکشی نیز میتوانند کارآمد باشند و سرعت کار را بالا ببرند.
- روش کار : با دقت و حوصله، بندکشی قدیمی را از بین درزهای سرامیک خارج کنید. مراقب باشید به لبهها و سطح سرامیک آسیبی وارد نشود. طبق استانداردهای فنی، عمق بندکشی برداشته شده باید حداقل به اندازه دو سوم ضخامت سرامیک باشد تا بندکشی جدید به خوبی چسبیده و دوام لازم را داشته باشد. این عمق برای چسبندگی و مقاومت بندکشی جدید بسیار مهم است.
- پاکسازی نهایی درزها : پس از حذف بندکشی قدیمی، درزها را با جاروبرقی یا برس کوچک کاملاً تمیز کنید تا هیچگونه پودر، گرد و غبار، یا تکههای بندکشی باقی نماند. این کار به چسبندگی بهتر بندکشی جدید کمک میکند. (هرگونه ذرات سست یا آلودگی میتواند مانع از چسبندگی مطلوب شود.)
3. انتخاب و آماده سازی پودر بندکشی جدید
انتخاب پودر بندکشی مناسب، کلید دوام و زیبایی بندکشی جدید شماست. پودر بندکشی PMA توانسته تمامی امتیاز استانداردهای کیفی را در سطح بین المللی دریافت کنه و گزینهای بسیار مطمئن و ایدهآل است.
- انواع پودر بندکشی : پودرهای بندکشی در انواع مختلفی مانند پایه سیمانی (معمولی، مانند پودر بندکشی PMA JOINT BAND که یک ملات اصلاحشده بر پایه سیمان است)، اپوکسی (مقاوم در برابر آب و مواد شیمیایی، ایدهآل برای محیطهای بسیار خورنده) موجود هستند. پودر بندکشی PMA با فرمولاسیون پیشرفته، مقاومت بالایی در برابر رطوبت و سایش ارائه میدهد.
- رنگ بندی : پودر بندکشی PMA در رنگهای متنوعی عرضه میشود (مانند سفید، لایتگری، گری، دارکگری و مشکی). میتوانید رنگی را انتخاب کنید که با رنگ سرامیکهای شما هماهنگ باشد یا کنتراست زیبایی ایجاد کند. (انتخاب رنگ مناسب میتواند ظاهر کلی فضا را بهبود بخشد.)
- مخلوط کردن : طبق دستورالعمل دقیق تولیدکننده (معمولاً روی بستهبندی) با آب یا مایع مخصوص مخلوط کنید. نسبت آب به پودر بسیار مهم است و باید دقیقاً رعایت شود تا خمیر بندکشی با قوام مناسب به دست آید. مخلوط باید یکدست و بدون گلوله باشد.

4. اعمال بندکشی جدید
- مرطوب کردن بندها : قبل از اعمال پودر بندکشی، بندها را کمی مرطوب کنید. این کار به چسبندگی بهتر بندکشی جدید کمک میکند، به خصوص اگر درزها بیش از حد خشک باشند.
- ابزار اعمال : برای اعمال بندکشی میتوانید از ماله بندکشی لاستیکی یا اسپاتول استفاده کنید.
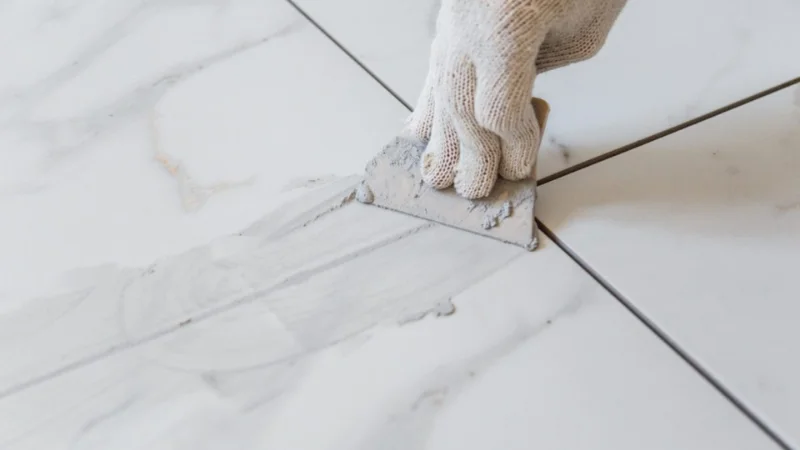
- روش اعمال : مخلوط بندکشی را با ماله یا اسپاتول با فشار زیاد و با زاویه 45 درجه بر روی درزها بمالید. اطمینان حاصل کنید که تمام درزها به طور کامل و بدون حفره پر شدهاند. حرکت را به صورت اریب انجام دهید تا بندکشی به خوبی به داخل درزها نفوذ کند و کاملاً فشرده شود.
- برداشتن اضافات : بلافاصله پس از اعمال بندکشی در یک بخش کوچک (مثلاً 1 الی 2 متر مربع)، اضافات آن را با لبه ماله بندکشی و با زاویه 90 درجه از روی سطح سرامیک پاک کنید. (نکته فنی: این کار را پیش از خشک شدن بندکشی انجام دهید تا از چسبیدن آن به سطح سرامیک و سخت شدن پاکسازی جلوگیری شود.)
5. پاکسازی نهایی و پرداخت
- زمان خشک شدن اولیه : اجازه دهید بندکشی برای مدت کوتاهی (معمولاً 15 تا 30 دقیقه بسته به نوع پودر بندکشی و رطوبت محیط) خشک شود تا کمی سفت شود اما کاملاً خشک نباشد و امکان پاکسازی نهایی وجود داشته باشد.
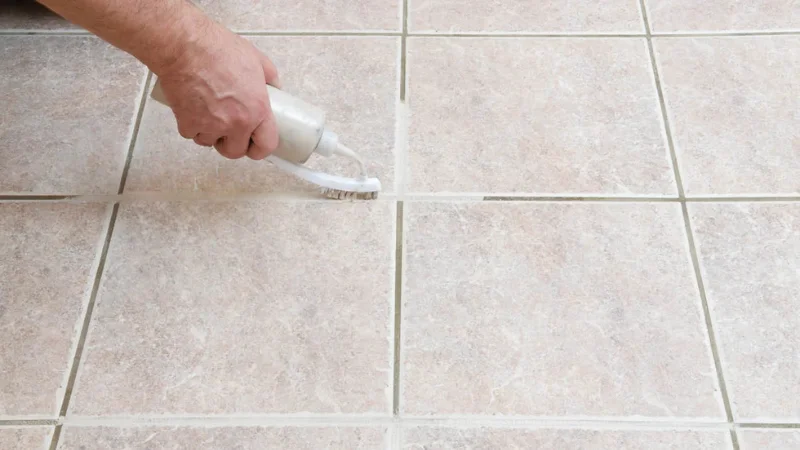
- پاکسازی با اسفنج مرطوب : یک اسفنج تمیز و مرطوب را به آرامی و با حرکات دایرهای روی سطح سرامیک بکشید تا هرگونه اضافات بندکشی و لکههای مات از بین برود. اسفنج را مرتباً در آب تمیز بشویید و آب اضافی آن را بگیرید. فشار اضافی وارد نکنید تا بندکشی از درزها خارج نشود.
- پولیش نهایی : پس از خشک شدن کامل بندکشی (معمولاً 24 تا 48 ساعت بسته به نوع پودر و شرایط محیطی)، ممکن است یک لایه نازک مات از بندکشی روی سرامیک باقی بماند. این لایه را میتوان با یک پارچه خشک و تمیز از بین برد و سطح را کاملاً براق و تمیز کرد.
نکات مهم برای یک ترمیم موفق و طولانی مدت
- تهویه مناسب : در طول فرآیند ترمیم بندکشی سرامیک، از تهویه مناسب محیط اطمینان حاصل کنید، به ویژه هنگام استفاده از پودرهای بندکشی (به خصوص نوع اپوکسی) که ممکن است بوی قوی داشته باشند.
- استفاده از دستکش، ماسک و عینک ایمنی : برای محافظت از پوست، بویایی و چشمهای خود در برابر مواد شیمیایی و گرد و غبار، همیشه از دستکش و عینک ایمنی استفاده کنید.
- دقت و حوصله : فرآیند ترمیم بندکشی نیاز به دقت و حوصله دارد. عجله نکنید و تمام مراحل را با دقت و پشتکار انجام دهید تا نتیجه مطلوب حاصل شود.
- عملآوری : پودرهای بندکشی پایه سیمانی مانند پودر بندکشی PMA نیاز به عمل آوری دارند تا به حداکثر مقاومت خود برسند. (راهنمای محصولات را با دقت بخوانید.)
- نگهداری منظم : برای حفظ دوام و زیبایی بندکشی، تمیز کردن منظم آن با شویندههای ملایم و غیر اسیدی توصیه میشود. از سفیدکنندههای قوی یا اسیدها (مانند جوهر نمک) خودداری کنید، زیرا میتوانند به بندکشی آسیب رسانده و رنگ آن را تغییر دهند.
فراتر از بندکشی PMA | IMPERIO، انتخابی برای دوام و زیبایی
در حالی که ترمیم بندکشی سرامیک میتواند به بازگرداندن زیبایی سطوح موجود کمک کند، انتخاب سرامیک مناسب از ابتدا نیز در دوام و زیبایی بلندمدت تاثیرگذار است. PMA | IMPERIO با طیف وسیعی از سرامیکهای بادوام، با کیفیت، در انواع سایز و سطح برای کاربریهای مختلف، حتی برای نمای ساختمان و محیطهای صنعتی، راه حلهای مطمئنی را ارائه میدهد. این سرامیکها با استانداردهای بالای تولید، تضمینکننده مقاومت و طول عمر بالا هستند.
برای کسانی که به دنبال زیبایی و شکوه بیشتر در دکوراسیون داخلی هستند، IMPERIO برند سرامیکهای لوکس با ابعاد و سطوح مختلف، گزینهای بینظیر است. در نظر داشته باشید که قیمت سرامیک اسلب پرسلان و قیمت کاشی پرسلان کف از برندهایی مانند PMA | IMPERIO، نه تنها نشاندهنده کیفیت و زیبایی بینظیر است، بلکه سرمایهگذاری برای فضایی با دوام و چشمنواز محسوب میشود.
نتیجه گیری
ترمیم بندکشی سرامیک یک فرآیند ضروری برای حفظ زیبایی، بهداشت و دوام سطوح سرامیکی است. با پیروی از مراحل و نکات ارائهشده در این راهنما، میتوانید به راحتی بندکشیهای آسیبدیده خود را ترمیم کرده و از یک فضای تمیز، زیبا و بادوام لذت ببرید. به یاد داشته باشید که انتخاب مواد با کیفیت، مانند محصولات شیمیایی PMA برای نصب سرامیک و به ویژه پودر بندکشی PMA JOINT BAND در دستیابی به بهترین نتیجه بسیار مهم است. همچنین، برای پروژههای جدید و یا بازسازی کلی، پیشنهاد میشود نگاهی به قیمت پودر بندکشی سرامیک و همچنین محصولات متنوع مابیندازید تا از دوام و زیبایی ماندگار سطوح خود اطمینان حاصل کنید.
آیا برای انتخاب نوع پودر بندکشی متناسب با نیازهای خاص پروژه خود نیاز به مشاوره دارید؟