


گرمایش از کف، یکی از پیشرفته ترین و کارآمدترین فناوری ها در تامین آسایش حرارتی ساختمان های مسکونی، اداری و تجاری به شمار می رود. امروزه با توجه به ضرورت صرفه جویی در مصرف انرژی و بهبود کیفیت زیبایی فضاهای داخلی، تقاضا برای اجرای این سیستم به ویژه با کفپوش های سرامیکی رو به افزایش است.
سرامیک به دلیل قابلیت رسانش بالای گرما، مقاومت فیزیکی و تنوع در طرح و رنگ، گزینه ای فوق العاده برای اجرا بر روی گرمایش از کف در نظر گرفته می شود. با این حال، برای رسیدن به کارایی مطلوب، رعایت استانداردها و اجرای صحیح مراحل الزامی است. در این مطلب با رویکردی جامع، به بررسی مراحل اجرای سرامیک روی گرمایش از کف، نکات فنی، ضوابط و قوانین استاندارد خواهیم پرداخت.
چرا سرامیک پرسلانی بهترین انتخاب برای گرمایش از کف است؟
سرامیک پرسلانی از دیدگاه علمی و عملی، بهترین گزینه برای کفپوش سیستم گرمایش از کف محسوب می شود. دلیل این امر رسانایی حرارتی بالای سرامیک است. هنگام عبور گرما از زیرکف، سرامیک به دلیل ساختار مولکولی خاص و تراکم بالا، فاقد خاصیت عایقی بوده و بخش زیادی از گرمای تولیدی را جذب و به محیط منتقل می کند. همین موضوع باعث جلوگیری از هدررفت گرما و کاهش هزینه انرژی می شود.
سرامیک هایی با استاندارد بالا، ضخامت مناسب و کیفیت درجه یک مانند سرامیک های پرسلانی، می توانند به شکل ویژه ای بازده گرمایی را به حداکثر برسانند. در صورت نیاز به تامین سرامیک با کیفیت برای پروژه های بزرگ ساختمانی نیز خرید عمده کاشی پرسلان کف توصیه می شود، چون علاوه بر صرفه اقتصادی، یکنواختی و یکپارچگی کف فضای مورد نظر را تضمین می کند.
روش های اجرای سرامیک روی گرمایش از کف
سیستم گرمایش از کف به دو روش کلی انجام می شود:
گرمایش از کف به روش خیس (آبی)
در این روش، آب گرم توسط بویلر یا موتورخانه تولید و با پمپ به لوله هایی که زیر کف ساختمان و در عایق نصب شده اند، فرستاده می شود. لوله ها، گرما را به لایه بتونی روی خود و سپس به سرامیک منتقل می کنند. پس از تست نشتی و اطمینان از سلامت لوله ها، بتن ریزی انجام و کفپوش نصب می شود. این سیستم به دلیل ذخیره گرما در جرم سازه ای، حرارتی یکنواخت و مصرف انرژی پایین دارد.
گرمایش از کف به روش خشک (برقی)
در این شیوه، المنت ها یا کابل های حرارتی روی کف عایق کاری شده پهن و به برق متصل می شوند تا حرارت تولید کنند. عناصر گرمایی، گرما را مستقیم به کفپوش (مثل سرامیک) منتقل کرده و نیازی به لوله کشی و بویلر نیست. نصب این سیستم سریع تر بوده و کنترل دما توسط ترموستات های محیطی انجام می شود. روش برقی بیشتر مناسب پروژه های بازسازی کوچک و فضاهای محدود است.
مراحل اجرای سرامیک روی گرمایش از کف
اجرای صحیح این سیستم نیازمند دقت و رعایت چند مرحله کلیدی است:
محاسبات و طراحی اولیه
قبل از هر اقدامی، مهندس طراح باید بر اساس متراژ فضا، میزان عایق کاری، ارتفاع سقف، موقعیت جغرافیایی ساختمان و توانایی سیستم تاسیساتی، اقدام به تعیین دبی گردش آب، فاصله لوله ها از هم، نقشه چینش مسیر لوله ها و تعداد کلکتورها کند. تمامی این محاسبات باید با هدف توزیع یکنواخت گرما و جلوگیری از نقاط سرد یا گرم بیش از حد انجام گیرد و روی نقشه تاسیسات نیز منعکس شود.
آماده سازی بستر و عایق کاری
لایه های زیرین کف باید کاملا تمیز و خشک باشند. ابتدا یک لایه عایق حرارتی مثل فوم پلی استایرن یا پلی اتیلن مخصوص کف روی بتن خام نصب می شود. این عایق از نفوذ گرمای تولید شده به سمت پایین سازه جلوگیری می کند و راندمان سیستم را بالا می برد.
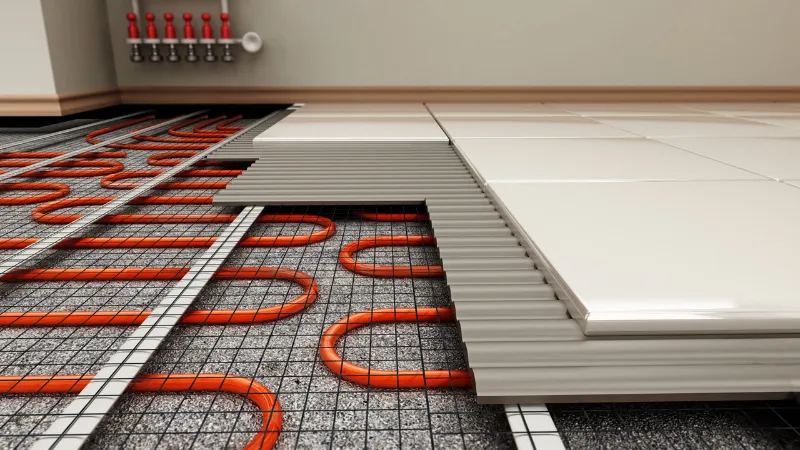
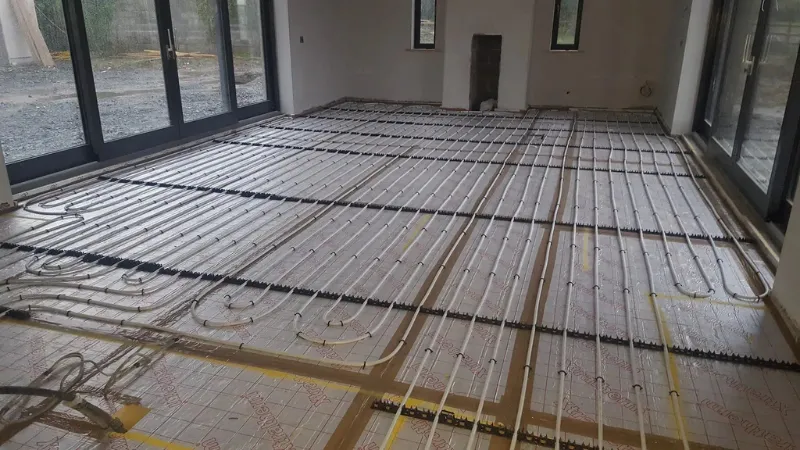
نصب لوله ها یا کابل های حرارتی
در روش آبی اجرای سرامیک روی گرمایش از کف، لوله های مقاوم پنج لایه با چینش مارپیچ یا مارپیچی خطی بسته به نقشه، روی شبکه شانه ای یا توری فلزی فیکس می شوند. فاصله لوله ها از هم، به طور متوسط بین ده تا سی سانتی متر است و باید از هم پوشانی یا برخورد آن ها با یکدیگر جلوگیری گردد. همچنین محل عبور لوله نباید زیر دیوار یا به روی سایر مدارها باشد. در نقاط خم، قرار دادن لوله در غلاف محافظ الزامی است.
تست نشتی و فشار
پیش از اجرای بتن ریزی یا نصب سرامیک، سیستم باید تحت فشار توسط آب یا هوا تست شود تا از عدم نشتی و سالم بودن همه اتصالات اطمینان حاصل گردد. این مرحله حیاتی است و هرگونه غفلت در آن می تواند به خسارت های بزرگ منجر شود.
بتن ریزی روی لوله ها
روی لوله ها باید با یک لایه بتن یا ملات ماسه سیمان روان پوشانده شود. به ازای هر صد کیلوگرم بتن، یک کیلوگرم روان کننده اضافه کنید تا بتن به صورت یکنواخت دور لوله بنشیند و از ایجاد حباب های هوا جلوگیری گردد. وجود حباب در بتن موجب اختلال در انتقال گرما و کاهش راندمان کف خواهد شد.
ایجاد درز انبساط
همانند دیگر پروژه های بزرگ ساختمانی، در اجرای سرامیک روی گرمایش از کف نیز لازم است در فواصل در نظر گرفته شده، درز انبساطی اجرا شود تا هنگام انبساط و انقباض بتن، ترک های سطحی ایجاد نشده و لوله ها آسیب نبینند.
خشک شدن کامل بتن
بعد از بتن ریزی، کف ساختمان باید بدون اعمال بار فیزیکی (مانند تردد زیاد یا جای گذاری وسایل سنگین) به مدت حداقل یک هفته باقی بماند تا بتن مرحله گیرش را سپری کند و خشک شود.
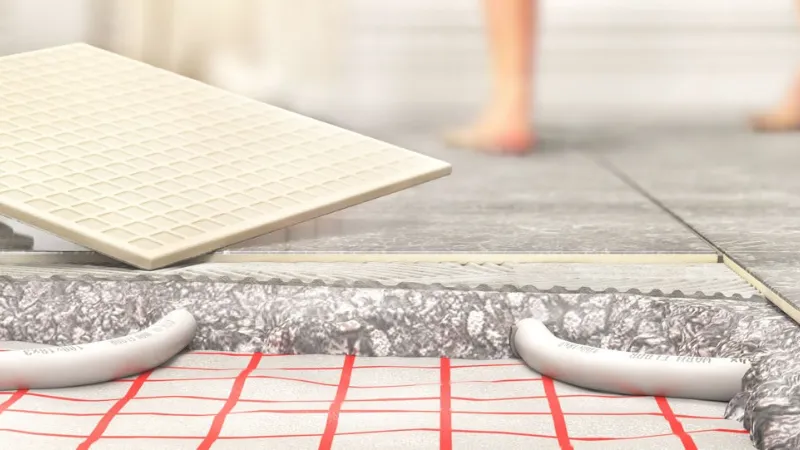
نصب سرامیک
پس از طی مراحل بالا و اطمینان از خشک شدن کامل سطح، نوبت به نصب سرامیک می رسد. در این مرحله لازم است از چسب کاشی پرسلان مناسب برای سیستم گرمایش از کف استفاده کنید که با فرمولاسیون ویژه، تحمل دمایی بالا و چسبندگی مضاعف دارد و مانع از جداشدگی یا تغییر فرم سرامیک در اثر تغییر دما می شود. چسب سیمانی متناسب با کاشی پرسلان (ترجیحا پودری) را انتخاب کنید تا بهترین کارایی را ارائه دهد و از بروز مشکلاتی همچون شوره زدگی یا ترک جلوگیری کند.
درزگیری اصولی
یکی از نقاط حیاتی اجرای سرامیک روی گرمایش از کف، بندکشی بین کاشی ها است. استفاده از پودر بندکشی مرغوب با خاصیت الاستیکی و مقاوم نسبت به تغییرات حرارتی، موجب می شود که خطوط بند بین سرامیک ها ترک نخورد و رطوبت به لایه زیرین نفوذ نکند.
نکات و ضوابط اجرایی کلیدی گرمایش از کف روی سرامیک
حال که با چگونگی اجرای گرمایش از کف روی سرامیک آشنا شدیم، به بررسی برخی نکات حائز اهمیت در نصب و اجرای این سیستم می پردازیم:
- در لوله کشی، لوله ها نباید از روی هم یا از زیر دیوار عبور نمایند.
- در لوله کشی این سیستم نباید در کف ساختمان از اتصالاتی مثل سه راهی استفاده شود و هر مدار لازم است گردش آب گرم مختص خود را داشته باشد.
- پس از بتن ریزی باید به مدت دو روز از رسیدن دما به زیر پنج درجه سانتی گراد خودداری شود و لایه بتنی باید کاملا خشک گردد و تا یک هفته در معرض بارهای سنگین قرار نگیرد.
- لوله های سبز یا لوله های پلی پروپیلن نیز برای اجرای سرامیک روی گرمایش از کف مناسب نیستند، چرا که ممکن است دچار ترک یا نشتی شوند و به جای آن باید از لوله های مناسب گرمایش از کف بهره برد.
- طراحی کلی موتورخانه جهت راه اندازی سیستم گرمایش از کف باید حتما توسط مهندس متخصص انجام گردد و قسمت هایی از لوله ها که دچار خم شدگی می شوند نیز باید داخل غلاف محافظ قرار داشته باشند.
- دمای آب در این سیستم هنگام راه اندازی نباید بیش از 25 درجه سانتی گراد باشد و افزایش دمای آب باید روزانه فقط 5 درجه سانتی گراد انجام شود تا از بروز شوک حرارتی جلوگیری گردد.
- تمام مدارهای سیستم باید به یک شیر مستقل مجهز باشند و پکیجی که برای تامین انرژی سیستم استفاده می شود، باید کنترل دو منظوره برای تنظیم دمای آب گرمایش و آب مصرفی داشته باشد.
- در نهایت، طراحی و اجرای سیستم حرارت از کف نیازمند دقت و تخصص است و باید تمام پارامترهای لازم مطابق استانداردها و توسط مجری ماهر رعایت شود تا کیفیت و ایمنی کار تضمین گردد.
مزایای اجرای سرامیک روی گرمایش از کف
اجرای اصولی سیستم گرمایش از کف با سرامیک مزایای متعددی به همراه دارد:
- راحتی و آسایش گرمایی
- کاهش چشمگیر مصرف انرژی
- عدم اشغال فضای کف و دیوار مانند رادیاتورها
- تناسب با دکوراسیون مدرن
- پخش یکنواخت گرما و حذف نقاط مرده
- عدم ایجاد گرد و غبار و سلامت هوای داخل ساختمان
- قابلیت اجرا در فضاهای نمناک مانند حمام و آشپزخانه
- دوام بالای سرامیک و سازگاری با گرمایش تدریجی
سخن پایانی
اجرای سرامیک روی گرمایش از کف یکی از پیشرفته ترین و اقتصادی ترین سیستم های گرمایش ساختمان محسوب می شود؛ به شرط آن که تمامی مراحل آن با رعایت ضوابط استاندارد، دقت و توسط مجری حرفه ای انجام گردد.
رعایت محاسبات دقیق، انتخاب مواد اولیه استاندارد، رعایت فواصل و استفاده از تجهیزات کنترلی مدرن تضمین کننده کیفیت، کارایی و دوام بالای این سیستم خواهد بود. با گسترش استفاده از این فناوری، ضمن افزایش سطح رفاه ساکنین، با کاهش چشمگیر مصرف انرژی ساختمان ها نیز مواجه خواهیم شد.